Thursday 26 September 2013

Part 5 - Programming adapter and cables


Here we are talking about different adapter cables that either have to be made or buy in order  to program the above accessories before they can be connected to the Crius board. There are two altogether two adapter cables for GPS and Bluetooth also converted USB-FTDI cable. 
 

i) Bluetooth consists of 4 pins which are Vcc (5V), Gnd (ground), Txd (transmit) and Rxd (receive).
ii) GPS has the same connector as bluetooth. The pinout details are described as in (i):
iii) MinimOsd is different compared to Bluetooth and GPS. It has 6 pins with 2 extra pins which are GRN           (green cable) & BLK (black cable). 
  • The reason for having 6 pins is that there is a reset command that gets sent to the MinimOsd when it is being programmed. If you are just using the 4 pins earlier (excluding GRN and BLK) you will face serious problem between bootloading, burning and flashing.
  • There is a hardware reset switch which you can send a reset command to the MinimOsd board by pressing it. It gets really tedious if you mispressing it or wait too long to press it where it may get bootloaded. Highly advisable you get a proper cable for this MinimOsd.
  • GRN pin is also known as DTR, whereas GND is known as CTS. BLK is the actual ground. (Guess this is done for orientation purpose)
  • You gonna need different programmer for MinimOsd compared to bluetooth and GPS. The MinimOsd is programmed by a FTDI programmer via a FTDI programming cable. (Recommended using FTDI programmer and not the programming cable since some ppl are having issues with the cables and it is more expensive than the FTDI programmer).
  • When I start programming all of these accessories, I did not use FTDI but I decided to build or convert a USB RS232 TTL converter which is normally used to programme Bluetooth and GPS. So, I modified it so that I can also use it to programme the MinimOsd. 
  • USB RS232 TTL has the same set-up as FTDI programmer with GND, CTS, 5V, TX, RX, and DTR pins.  These allow me to convert USB -RS232 TTL programmer into a FTDI programmer which enables me to programme both Bluetooth and GPS with USB-RS232 TTL and the MinimOsd.  Then we have to label the wire by printing the same text exactly as in the FTDI programmer (GRN, TX, RX, VCC, GND, BLK) to prevent mistakes. 
  • Please take note that  I actually swap the pin TX and RX between MinimOsd and USB-RS232 TTL. Here, I just change the connection of the wires connecting to TX and RX of USB-RS232 TTL.
iv) In programming GPS and Bluetooth, we are using the same type of cables here which is the USB-RS232      TTL connected a header. But this time, we have to do a bit modification on the header since both GPS          and Bluetooth only needs 4 pins connection. (GRN=DTR and GND=CTS not required).

Attached picture below shows the detailed connection of wires for each of the accessories above.


As usual, a song for a day to cheer up and have greater faith in God :)
~ Cornerstone ~


That's all folks :)

Tuesday 24 September 2013

Three more days before leaving for World Solar Car Challenge in Australia....gotta hurry up!!!

Part 4 of Jose Tutorial:

Generally, Jose didn't explain much on each of the accessories here as attached below. Detailed explanations on functions and connections of these accessories will be done in the following video. So, make sure you guys catch up with the upcoming videos!!!


SUPPLIED ACCESSORIES IN UAV SISWA CHALLENGE
 
Take note: It is recommended to power the accessories by external power supply where the yellow jumper must be removed and connect 5V UBEC power cable to the extended power port under the PPM pin on AIOP V.2  board. (Extended power-in port is located differently in AIOP V.2 board as shown below)

Power connection

Just in case you guys are too excited and curious with the accessories above, try search for the technical datasheet. It is good to know every specifications and precautions of the accessories for the sake of safety.

Part 4: Accessories


Part 5: Programming Adapter and cables (http://www.youtube.com/watch?v=kxtoTu_6CCs)

THAT'S ALL FOLKS :)


As usual, a song for a day : Christ is enough (Acoustic version Live)


Friday 20 September 2013

So far so good~ Part 1 - 3 done ; )

Have finally finished installing all the relevant software for my UAV project including the Mission Planner Mav1.0....wow, feeling excited!!!! Right now, i'm progressing to learn Arduino programming since i was given an Arduino Uno board by prof yesterday. Looking forward to it.....gonna spend my weekend on this probably.


Arduino UNO Board


Just a little sharing here on Crius AIOP tutorial Part 3:
 (Here, we are using MegapirateNG V2.8 R3, Arduino 1.0.1, Ublox GPS, Hexa Frame, X Frame)
  • Assuming you have gone through tutorial part 1 & 2, extract MegapirateNG V.2.8 R3 into Crius file created earlier.
  • Copy library file from MPNG folder and replace with the one in Arduino 1.0.1 folder. (This to ensure that the library to be used in Arduino programming later is the same as in MPNG)
  • Plug in the cable into your laptop and it shall install the device driver automatically. (LED starts blinking) 
  •  Click into the device manager and try to look for the device installed. Identify the port. (COM 7) 
  •  Go to Crius file and open the arduino application file
                            i) Tools > Select Arduino Mega 2560/ MegaADK

                            ii) File   > Open Arducopter file in MPNG and select
                                            ArduCopter.pde

                            iii) Close previous window. (Empty sketchbook)

                            iv) Go to APM_Config.h and do changes on parameters
                                 define.
                                    a) #define PIRATES_SENSORS_BOARD
                                        PIRATES_CRIUS_AIO_PRO_V2
                                    b) #define CONFIG_BAROAP_BARO_MS5611_I2C
                                    c) #define GPS_PROTOCOL GPS_PROTOCOL_UBLOX
                                    d) #define FRAME_CONFIG HEXA_FRAME
                                    e) #define FRAME_ORIENTATION X_FRAME

                             v)  Compile and upload into your AIOP V.2 board.
                                 *There shouldn't be any errors while compiling.
                                    If errors occur, try recopied MPNG library
                                    file to Arduino file. If problem persists, uninstall
                                    your Arduino software and delete all the directories
                                    before re-installing.          

Now, we may proceed to Part 4 of Jose tutorial. The links for part 1-4 are given as below:


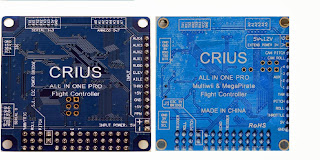
Comparisons between AIOP  V2 and V1.1


As usual, a song for a day : ) Ocean will part by Hillsongs (Annie Garratt)

Present suffering may pass, 
Lord, Your mercy will last
As You open my eyes to the work of Your hands
And my heart will find praise, 
I'll delight in Your way
As You open my eyes to the work of Your hands


Wednesday 18 September 2013

To think that i'm actually going to have a blog in my life, wow...this is truly amazing!!!

Well, never thought that i'm going to have my own blog in my 23rd ...... just to fulfill one of the requirements set by my faculty this year for my final year project assessment. Thinking that this would actually creates an opportunity for me to share my life and of course, God's wonder......i guess no harm giving it a try :)
SHALOM!!!

As a good starting for my blog, there's a video i would like to share with you all as an encouragement :) CHRIST IS ENOUGH~